Friday, February 28, 2014

Out with the Old, In with the Bold

I'm always wishing for more cute accessories that look unique and fun -- just like me!

So when looking on Etsy for inspiration for this project, I came across these beautiful earrings:


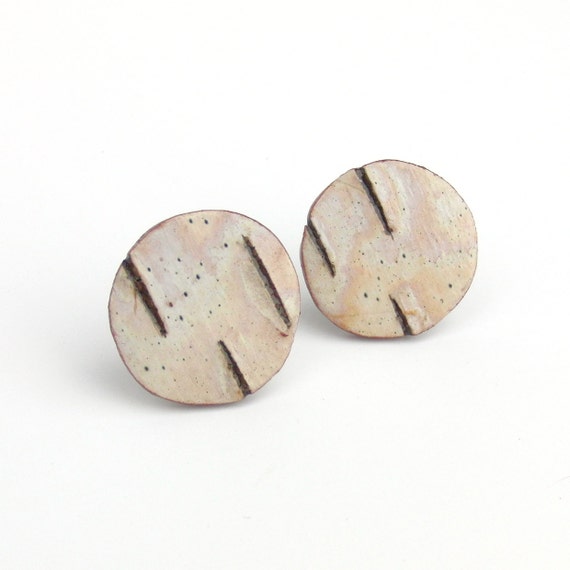
Nice! Those are interesting. I'd love to make them, but...
I have a policy to keep my wardrobe under control: if I buy something new, I need to get rid of something I don't wear anymore.

Thankfully, I had an old pair of dangle earrings that I never wear. Hey-- if I'm going to get rid of these earrings, why not recycle the earring backs into my new earrings?

Witness the awesome outcome:


Ooooh. How do they look in practice?


Solid! I call this a challenge well-completed.

Star Light, Star Bright...

...Birch Star I See Tonight


So, it comes up in conversation that today is the last day of February, and the last day of our birch bark challenge. I've been so busy this month, I hadn't even thought about it. But since I missed last month's challenge, I wanted to try to do this one.


I jumped on the computer to see what I can come up with. I kept thinking, I wanted to do something practical, something I could actually use for some purpose later. I scanned the pintrest boards. Lots of candle holders... but I already have those from the tin can challenge. Finally, I just told myself, this isn't supposed to be a practical project, it's supposed to be fun


So I go locate my bark, to see what I have to work with. It's not white. I wasn't expecting that. But it has some neat colors, and interesting texture, and is warped in a wavy form. I decided I really wanted to do something that would preserve as much of this uniqueness as I could.


Thus, in the course of less than an hour, and with the help of some scissors, hot glue, and string, my star was born!


Birthday Greetings

What ho! Another cluster of hearts!


I found this idea on Pinterest and decided to use it to make a birthday card for a friend. 
The original card is from .


Grab a handful of love and f-l-y !


---


Saturday, February 22, 2014

Oil Slick

My husband's car had a problem with it's oil pan not being seated correctly. We figured out something was wrong because we started seeing this oil on the floor of the garage.


Well, he saw oil.

I saw a heart.


.

Wednesday, February 19, 2014

Oh, Deer!

When I took Jodie back to Corvallis after Thanksgiving, our original plans didn't pan out. So we hit a craft store for a few supplies and headed back to the hotel for a crafternoon. Card blanks, paper, scissors, Sharpies, ink pads, and our own thumbs was all it took. Cute, eh?


We glued this sentiment inside.


and


We got the idea on Pinterest


Tuesday, February 18, 2014

I solemnly swear that I am up to no good

I saw this great inspiring pin quite a while ago that I thought was cute. I also thought I could do it better.


We aren't ashamed to admit we're a family that loves Harry Potter. In fact, I got my boyfriend to read the books for the first time within the last year. I'm just pushy good like that.

I told my friend Jessica what I wanted to do and last summer we went to a thrift store to find frames for the project. I'm sad I didn't take before pictures of what I bought. It was quite weird pictures embedded in these frames. How weird? Well,  one was of beans and one was of a pot with what turned out to be cabbage. There was some kind of French on it. If I remember correctly, Jodie translated it to something like "young/green beans" and "cabbage soup". And these pictured were really stuck in the frames. I think I would have had to break the frames in order to get the pictures out.

It took a long time for me to get the project done. Initially it took a long time because I couldn't figure out how to cover up the weird French stuff. Hint: white tempera paint, while sounding like a good idea is actually horrible. Eventually my art education friend told me to try Gesso since it was pretty much a surface primer. After I got the Gesso on, I painted the surface with a paint color called "parchment". I also figured out exactly which font I wanted to use. Then I had to ask my art education friend how I could transfer the font to the surface. He suggested I use carbon transfer paper. It worked really well (eventually).

There was something like a 6 month delay between when I put the Gesso and paint on and when I finally finished. What took so long? Well, I couldn't decide how to get the thing to look the way I wanted. So it sat around. And sat around. And I had to kind of hide the project in a corner so I didn't have to look at something I should have finished super fast.
Eventually my wonderful boyfriend was bored, wanted some kind of project to finish, and when presented with my situation suggested coffee.

I swear, no matter how long this story feels, it's way faster to read than it was to experience.

Well, to shorten part of this story, we had to rub coffee grounds on the surface of the canvas. It's not canvas, but it's what I'm going to call it because that's the easiest explanation for what it is. So we rubbed grounds around on the surface until we had a kind of interesting effect. I let it dry for a day or two, then we each took one frame, the carbon paper, and the corresponding words and spent a while tracing. The next day I very carefully painted the words. They're tiny and my smallest paint brush was almost too big. I actually used a toothpick on some parts.

After I let the paint dry, I decided to touch up some of the coffee ground parts. I let that dry then grabbed my Mod Podge and tried sealing the pictures. Oh no, it did not work. Mod Podge is too thick and it started to carry away the coffee staining. Of course, this led to panic. Needless to say, don't put coffee grounds on anything that's recently had Mod Podge on it.

Eventually I (mostly) fixed the staining on the Mod Podged frame. I found some spray Elmer's glue stuff I've had for a few years and sprayed a layer of that on each frame. I let that dry for probably 2 days before I decided it wasn't tacky and was sealed.

Here's what they look like:


I bet you can identify which one I had to re-stain. Anyway, these beauties sat around for another month and a half until this past weekend.

Jeff (the boyfriend) finally convinced me to hang them up. Originally I wanted one on either side of my back sliding door. Unfortunately, I used one side to put up my shelves of plants so they get light. I only have the one side left. We hung them up there anyway.


They don't look half bad, huh? They'll only be there on the wall for a few months. I'll be moving around the end of May, but these will come with me. I'm thinking wherever I put my library in my new apartment, I'll hang these too.

It's a long story, but I wanted to explain that these have been in the works for a long time now. I'm quite happy with how they came out.


Monday, February 17, 2014

READ the Cans

This post is so out-of-date it's ridiculous. I apologize, but at least I did the project eventually.

We had a group challenge last October to make lanterns out of tin cans by using nails to punch holes. My mom and sister did theirs in a timely manner, but I didn't. I actually shoved cans in the freezer at the appropriate time, but I never pulled them out to take a whack at the project. Initially I used the excuse that I needed a bigger nail. After I failed to get a bigger nail (and was in fact warned against it), the cans kept getting shuffled around in my freezer. I've really been needing the space they take up, though. And as it's Presidents' Day and I don't have work, I decided to finally do this project so I could fit all my frozen veggies.

Look, I'm pretty sure that by "leaves" as my theme, I'm more often going with leaves of a book rather than leaves from trees. I have every intention to do tree-like things, but then I get distracted by books or library-related things. So I present to you my READ cans.


By the light of day, they're pretty ugly. I didn't paint them or finish them or anything. I don't have spray paint and I don't really want to spend time on these cans with paint I'm pretty sure will peel off.

Look at them with the lights off and candles inside, though!

 
It's almost charming, right?

Well, I'm not sure what I'll do with them now, but at least I've done the project and have that space in my freezer again.


Sunday, February 16, 2014

Anniversary Banner

Last week my husband Dale and I celebrated the 25th anniversary of our first date. I made a little something special for him. Here's how:

I started by finding a nice heart shape and cutting it out of cardboard. I used this as a template to trace and cut 10 hearts out of burlap.


Because the burlap frays easily, I "painted" some Mod Podge on the edges of the backs of the hearts. This glue dries clear, so it can do the job without being seen.


Next I chose my felt. I used two shades of pink, two shaded of purple, and red. I made another heart template about a half inch smaller on each side than the burlap heart. I traced the shape with a black Sharpie on the back of the felt.


I cut the felt hearts out with pinking shears for a nice effect.


I pinned a felt heart to the center front of each burlap heart. As you can see, the Mod Podge, seeping through from the back, hadn't completely dried yet.


Then I strung a piece of twine between the felt and burlap. I alternated the heart colors as I threaded the hearts onto a single piece of jute twine.

Taking my hearts to my sewing machine, I used a long stitch to sew the felt to the burlap down the center of each heart. While doing this, I tried to keep the twine about an inch and a half from the top of each heart so that they would line up evenly.


The double layer of fabric was a bit heavier than I'd anticipated, so the twine wasn't quite doing the job of holding the hearts in place. So I slightly overlapped the side edge of the hearts, pinning them in place. Then I hand stitched / tacked the hearts into place with tan thread, couching the twine in the stitch.

The banner was complete! If I were to use this for Valentine's Day, It would be ready to hang.

But since this banner was for our anniversary, I added one more bit. I went to the computer, found a font I liked, and printed out the words "25 YEARS." I cut out the letters, then pinned them to the center of the hearts (I pinned between the two layers of the hearts so the pins wouldn't show, nor would they scratch the furniture). This way I can easily remove the letters and use the banner for Valentine's Day next year. 

I made simple slip knots to hang the banner from the headboard of our bed.

It was a nice romantic surprise for my Dale.


I was inspired by a couple ideas I saw on Pinterest:


and this


Friday, February 14, 2014

Valentine Soup Surprise

I made some homemade chicken vegetable soup with a little surprise in it for my husband. Here's how:

 Peel a carrot. Cut a v-shaped groove in one side.

Make a diagonal cut on each side of the carrot to form a V at the bottom.


This will form the shape of a heart if you look at the end.

Now make little quarter inch slices along the length of the carrot.

Now you have your hearts to drop into the soup!

It's a happy little surprise for your loved one. A truly "heart-y" soup for body and soul.


I found this idea on Pinterest:


Wednesday, February 5, 2014

Birch Bark Challenge

Back in April 2012, Dale and I took a trip to Cranbrook, British Columbia, Canada to celebrate our wedding anniversary. While there, we took a little hike on Zuckerman's Island along the Columbia River. We hunted a geocache, and enjoyed examining the unusual little Russian Orthodox Chapel that was built on the island back in 1935.


All along the trails among the evergreens were stands of birch trees. Many were fallen and many more had piles of white birch bark at their roots. Since we don't have a lot of birch in my neighborhood, I scavenged some of the bark knowing that it can be used in craft projects. My daughters and I divided up the birch bark later that year, but we haven't gotten around to presenting this challenge until now.


February's AuralArtists challenge is to use the birch bark to make any kind of craft project you wish. I have a Pinterest board where I've started to gather ideas on how the bark might be used. I think I may make a heart-shaped key fob or zipper pull. Or maybe I'll use my bark to make a Valentine gift. Once I begin, we'll see where the muse takes me.


.