Saturday, December 27, 2014

Double Challenge Trouble

As 2014 quickly draws to a close, Mom and I feel queasy leaving some of our monthly challenges unfinished. So, with an eye on efficiency and fun, we got together to nail down some of these projects.

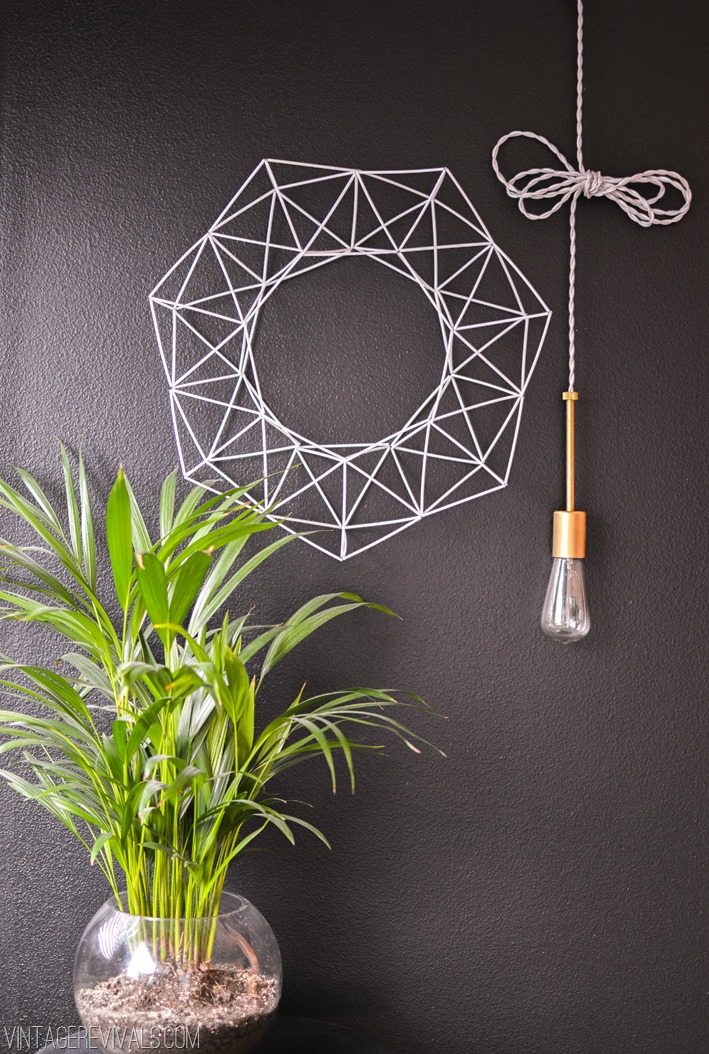
This first completed project combines both our October beading challenge and our December wreath challenge. We really liked the look of this Hemmeli wreath and decided to duplicate it for ourselves.


From Vintage Revivals

The instructions were incredibly easy to follow. We used coffee stirrers rather than cocktail straws and 24 gauge wire rather than 30 gauge, and our Hemmeli wreaths turned out beautifully.


I'd like to use some black mini clothespins to put up some Polaroid-size photos.


Mom's a fan of the interesting shadow the sculptural wreath casts on the wall.

Lovely way to spend an hour and a half!


---


Wednesday, December 10, 2014

Cave Digger

I saw a great piece about an artist, Ra Paulette, who spends his time building, sculpting, and creating art in caves. This is a detail shot from one of his caves.


This video is worth watching to learn more.


.


Wednesday, October 22, 2014

October Group Challenge: Beader Late Than Never

So, October's AuralArtists' Challenge is supposed to be, crafting with beads!

Vánoční hvězda z korálků ,,čokoláda ,,7 ,, Vánoční hvězdička z korálků a perliček na pevné drátěné konstrukci , velikost 9cm  v barvách smetanová  čokoládová


It's quite late in the month to be finally posting the challenge, but we've all been a bit busy with jobs, school starting, house reorganizing, and a year-long project that was finally completed. 

Hopefully, at least one or two of us will still be able to complete this project.

Pintrest board ideas here!


Sunday, September 14, 2014

Playing With My Food Again

Dale and I went to Olive Garden for soup, salad and breadsticks. It was a lovely lunch, as usual. When our server took away the dishes at the end of the meal, this piece of lettuce was left on the table. 

"Look, Dale!"

"What? Is that a heart? You really gotta want it."


I want it.  :)
.
.

Monday, September 8, 2014

I like to ride my...

I love the Pinterest boards that Mom set up at the beginning of the year! They've been so helpful as I figure out my monthly challenge. This month, I spotted this cute bicycle button necklace.


I'm not super skilled with wire work, but I gave it a shot.


Not bad! :)


Sunday, September 7, 2014

If You Give a Kitten a Feather...

... he'll probably wear himself out chasing it. I realize this story isn't new, inventive, or nearly as long as the If You Give a Mouse a Cookie or If You Give a Moose a Muffin books, but it's probably just as amusing.

(Disclaimer: I am not married. I'm using in-laws just to describe their relationship to me and my cat. It's much easier than typing "my boyfriend's mother" every time.)

I have a 4 1/2 month old kitten. He moved in to our new place about 20 minutes after we did. We didn't plan on getting a kitten so fast, but events lined up and now he's here.

Fawkes McBitey on a bookshelf

Fawkes is a 4 1/2 month old semi-professional parkour kitten. He wants to jump, play, and bite everything in existence until he suddenly falls asleep like a narcoleptic. So, essentially, he's a perfect specimen of kittenhood.


My mother-in-law made a cat toy for her old cats and has kept it around even after their deaths.
She gave it to us a week ago. We enjoy it, but there are a few things that could be improved upon.


The biggest issue is that the dowel she used is fairly thin. Fawkes is particularly strong, so the dowel is already bending quite a bit.
The duck tape is actually fine for attaching everything together. The cord is three pieces of yarn braided together. I wager the feathers are real feathers (my father-in-law is a hunter, plus they live out in the middle of nowhere).


I used a bigger dowel, shoestrings (which he loves) for the cord, craft feathers, and suede cording. The kitten's collar came with a bell, which he adamantly demanded we remove last week. I included that on the toy because it seems to irritate him (in a good way).


Most of it is just knotted together. I used hot glue to put together three bunches of three feathers, wrapped the outside of the big bunch with double-sided tape, then tied the suede around it. I threaded the bell on a small bit of string and tied that around the outside as a final (unplanned) addition. I don't know how well the craft feathers will hold up, but I think it'll work out for a while. The suede I left pretty long because I figured it would be okay for him to chew on it, and I'd rather plan on him chewing on it and providing for it than him just finding it later and tearing the toy apart trying to get to the suede.

We had to lock him out of the room when I was making it because he wouldn't let me tie anything or glue anything without trying to attack. We also have craft feathers scattered all over the house. I'll have to secure them.

These are about the only pictures I could get before the kitten started attacking the toy. He absolutely loves this thing.

Cue the multiple pictures of kitten playing.


 We took about 30 pictures of him playing, but these are the only pictures that turned out. He was a big blur in all the rest (and he's blurry enough in several of these).
 
 He played so long he ended up panting. About ten minutes after that, he was asleep on the couch. We may have to hide this toy while we're at work since he has little self-control and might tire himself out too much.


Friday, September 5, 2014

Yo Quiero Amar

OK
This one is totally silly.
But these hearts just find me.

Lovin' me some Taco Bell potato bites.


.
.


Monday, September 1, 2014

September Challenge: Buttons, Buttons, Buttons

For September, our challenge is to use the everyday button in an interesting way.


As embellishments


As a mosaic


On stationery


As fun and funky jewelry


Or even as something to eat!


More more ideas and inspiration, check out our Buttons Pinterest Board. If any of our readers would like to join us in this challenge, email me or leave a comment. We'd love to have other artists join us!


Sunday, August 31, 2014

Heartfelt Coasters

This month all four of us finished our Paint Chip Challenge! Hooray! I drew the inspiration for my project from these mosaic greeting cards by Chica and Jo. But instead of greeting cards, I decided to make tile coasters.


I began by purchasing a new craft tool. This is a one-inch heart-shaped paper punch from Martha Stewart's craft collection. I found it was too large for the standard several-shades-on-one-card paint chips, so I used the larger size chips and was able to punch about 10 hearts from each card. I chose tones of cranberry and forest green to compliment my home's color scheme.


Once I cut out the hearts, I played with them to create a pleasing pattern on my plain white 4-inch tiles. I decided to make all four coasters in the same colorway. Luckily, I had some tiles left over from a home improvement project, so I didn't need to buy them.


I used "Super Gloss-Brilliant" Mod Podge to adhere the paint chips to the tiles. I wanted the finished product to be nice and shiny so that they still looked like tiles with a high-gloss finish. I found this formula of Mod Podge at Walmart for around five dollars.


I started with a thick-ish layer of Mod Podge on the tile, then pressed the hearts into it. I then added another layer of Mod Podge over the hearts. Then I smoothed out the globs of the glue to the best of my ability so that the finished product would be as flat as possible. I found that the paint chips didn't want to lie flat. So every time they started to curl up, I used the wood end of my sponge brush to push them flat again.

[Like this fuzzy action shot?]


I let the pieces dry for a couple hours, then added another layer of Mod Podge. I used four layers altogether. With each layer, I applied the glue in a different direction:

  1. top to bottom
  2. right to left
  3. bottom to top
  4. left to right
The finished tiles have a cross-hatch look to the finish which you can see clearly if you look at the top of the hearts on the tiles from this angle.


.
Next, I used some felt adhesive dots to keep the backs of the tiles from scratching the tabletop. These are the thick felt dots found at a hardware store that you can adhere to the bottom of furniture legs to make moving heavy furniture easy and keep it from scratching a wood floor. Luckily, I had some of these left over too.


Using five pads on the back keeps each tile quite stable. The felt pads raise the tiles off the table like this:


.
I'm so pleased with the final result! If I were to change one thing, it might be to paint the sides of the tiles and cover them with Mod Podge, too. That would give the coasters a completely finished appearance. 


But for now, I think I'll just sit back and enjoy a nice tall glass of iced tea on this holiday weekend.


.
---
.
.
My project was inspired by this project I found on Pinterest by Chica and Jo:


Saturday, August 30, 2014

For This Week...

Even though I didn't have paint chips, I made a special run to a paint department to collect some just for this project.

When I first saw paint chip projects, I loved this calendar idea:


I'm not sure if I love it because it's green or because it's so organized or if it's somehow related to the fact that I'm a Virgo (which theoretically means I love organization). What I can tell you is that I just love it. And I just moved, which means I could use it for the house calendar.

Sadly, my boyfriend and I determined neither of us uses calendars enough to justify the space this one would take up. When I saw a weekly calendar, we agreed we could use one that size.


Once I had a basic idea, I took it my own way. I bought a certificate display frame for something like $2. I already had the background paper. I made sure to select paint chip colors both Jeff and I would like. A bit of measuring, cutting, taping, and doodling and I made this:


It's behind glass so we can use white board markers to change the plans for the week. I used a Sharpie pen not marker (have you tried these? they're incredible and fun!) to write the abbreviations on the paint chips. I also used them for the doodle in the middle space. (You'll notice the doodle looks like vines with some of the ends having leaves.)

The week is an odd number of days, so I gave the bigger squares to the weekend since that's usually when we're busier.

I also got 8 heavy duty magnets from the hardware department for an additional $2. After double-sided tape failed to keep it all attached, I took Jeff's suggestion and hot glued them to the back. I used all the magnets (four piles of 2 magnets) to make the frame tall enough to actually stick to the fridge.

If it seems pertinent, we'll write the date on each paint chip to determine which Saturday we're looking at (today or next week).


Here it is, attached to the fridge.

I hope we'll use it. Jeff sometimes has plans he forgets to tell me about, so I'll be happy to have this as a reference point.