For 2015, the AuralArtists are going to try a new kind of challenge. Instead of using a common medium, like we did each month last year, I am putting together Mystery Boxes. Every two or three months, I'll put together a box full of craft "ingredients" and send them to each of my daughters. The boxes will contain similar-but-not-identical items. Each of us will create a project with the supplies, adding in anything else from our craft stashes and a minimum amount of money for additional supplies.
The first Mystery Box was a test that I put together at Christmastime. I made one for myself, one for Jodie, and one for my good friend Virginia who lives across the country. The idea was to use at least six of the items in the box, anything from our stashes, and no more than $5 of extra supplies. We each had different/coordinated colors of items. Mine were mostly pink and white. Here's what we started out with:
In addition to these supplied items, I used the following items from my stash for my project. After I got started, I also switched out the white felt supplied in the box. I substituted a piece of black glitter felt for the background because it made the heart "pop" more than the white.
I decided to turn my flat picture frame into a shadow box frame. I added the depth with the bottom of the cardboard box. I began by gluing the black glitter felt to the inside of the box.
Then I mended the broken ornament by gluing the ribbons, flowers, bows and bells back in place. I left the hook attached to the hanging cord.
I primed the wood frame with Gesso. When it dried, I mixed a little red paint into a bigger portion of white paint until I got a sweet shade of pink. I painted the frame, front and back, with two coats of pink paint.
I hot-glued a line of iridescent pearl beads around the frame opening.
Before I got too far along, I had to figure out how to attach my box to the back of the frame, how to attach the ornament so it would hang freely, and the mechanics of how to hang the finished piece. This photo is a little confusing, but it's looking down on the top of the frame, tilted so that you can see the top of the frame, the side of the box, and back of the cardboard box at the same time. I punched a hole in the center of the side of the box (which is now the TOP of the frame). I poked the wire ornament hanger through the hole and fiddled with it until the ornament hung in the middle of the frame opening. Then I folded the wire over the edge of the box (to the back) and taped it in place.
Next, I centered the cardboard box on the back of the frame, and held it in place with duck tape. The entire frame is quite light, so duck tape is strong enough to hold it securely.
Then I need to come up with an innovative hanging technique. I decided to use the elastic cording and a couple paper clips. First, I made a small slit on on the side of the cardboard box, about 1/3 of the way down from the top of the frame. I tied one end of the elastic cording onto a paper clip, and pushed the clip (and knot) through the box to the inside of the frame. (I didn't have any black paper clips, so found some that were fairly dull so they would be camoflaged in the shadows). Then I eyeballed the length of elastic cording I'd need, cut it to length, and tied the other end to the second paper clip. I made another incision on the opposite side of the box and pushed the paper clip through to the inside. Clever!
I covered the back of the cardboard box with more duck tape to give it a more finished look.
Now it was time to decorate the front! First, I hot-glued the nylon cord around the perimeter of the frame. After playing with the bits and bobs for a while, I came up with this design. In the bottom right corner, I glued the three small flowers. Then I sprinkled in some of the sequins. I cut apart some of the left-over pearls and glued one to the center of each sequins.
In the top left corner of the frame, I glued down the feather butterfly. I added more sequins and beads here.
Then I added buttons to the corners of the frame opening. I really like how the black background sparkles behind the hanging ornament!
Ta-Da!
These were the only items I didn't use. Don't be surprised if they show up later this year in another mystery box.
The second Mystery Box Challenge will be opened by the other artists tomorrow. The items might work quite nicely for an Easter decoration. I still haven't decided how I might use my supplies.
Friday, February 13, 2015
Friday, January 16, 2015
2014 Gingerbread Challenge
The story, you ask? Well on Veteran's Day last November, Dale and I were finishing up our breakfast at the local diner when we got a phone call. From the police. (Yike!) Saying that a tree had just fallen through our roof. (Yikes!!) We got home to find the fire department waiting for us and, indeed, the top 20+ feet of a huge pine tree in our yard had snapped off and bulleted through our roof. I pretty much felt like this:
But when push comes to shove, what can you do but laugh at the foibles of life, and fix things up. So making a gingerbread cottage with a tree about to come down on the roof was one way of finding humor in the situation. The front of the house does look festive, doesn't it? I particularly like the little ribbon bow on the wreath.
The back
and sides were fairly plain. Just some gumdrop bushes and crystal-yellow sugar to light the windows. Not a single heart to be found!
Unfortunately, we only had one day together to work on our gingerbread village, so I was unable to get any more landscaping done. We had some grand plans to tie our cottages together with a Smarties cobblestone path. In the center of the village square we were going to have a giant tree. Then we planned to have some elves holding hand while encircling the tree.
Sigh
It looked really good in my mind! But with all the stress of getting our home put back together after the tree incident, I was too pooped to make the rest of my vision come to life. Besides, it's not nearly as much fun to work on the village when the rest of our artists are not with me.
Monday, January 12, 2015
Holiday Wreath
Though we never managed to post the official December Challenge, it was to make a wreath. This is one of the two wreaths Jodie and I made over her winter break.
---
On the night before Christmas ...
Jodie and I wanted to take a little something to the family gathering. We made some Chex Mix (no bagel chips and we use Pretzel Goldfish) and put it in a cute container (from the dollar store)
and some Five Minute Fudge (all milk chocolate and extra walnuts in our version), then decorated a gold plate (from the dollar store) with the edibles.
Thanks to Jodie for taking all the photos.
---
On the night before Christmas ...
Jodie and I wanted to take a little something to the family gathering. We made some Chex Mix (no bagel chips and we use Pretzel Goldfish) and put it in a cute container (from the dollar store)
and some Five Minute Fudge (all milk chocolate and extra walnuts in our version), then decorated a gold plate (from the dollar store) with the edibles.
We added an LED color-changing candle (from the dollar store) to the center of the fudge.
Grabbed the glue dots
and applied four little bits to the candle rim.
Then snugged the cute container of Chex Mix onto the candle.
But it looked a little plain and a whole lot out of balance - the shape of a lighthouse!
So we cut some small poinsettia silk flowers (also from the dollar store)
and tucked them into the sides and top of the fudge wreath. Then turned on the candle.
Ahh! Pretty!
Thanks to Jodie for taking all the photos.
Sunday, January 4, 2015
Pick a Size, Any Size
"Shrink Plastic Challenge - Part 2"
Back in June 2014, we had a group Shrink Art Challenge. At the time, I managed to get as far as making a ruler out of opaque shrink plastic. While Jodie was home for winter break, we sat down to complete our Shrink Art Challenge. She'll be posting her cute finished project here soon. My "real" project has a lot of steps, so it will be a while before it's done.
In the mean time, I decided to make rulers out of the clear and white shrink plastic. Each type of plastic has a different rate of shrinkage, even when baked at the same temperature and at the same time. So I took the time to make these rulers so that I could have an accurate measure for future shrinking projects.
I used Sharpies as my color fill. Having an example of how each color reacts to the different plastics is useful. Each ruler started out in one-inch increments. Holes were punched in the ends to help determine size for future use of jump rings in jewelry.
The hole on the left began as a standard 1/4 inch hole punch.
The smaller hole on the right began as a 1/8" hole punch.
All this prep is not as much fun as working on actual projects, but it's good to test the materials before beginning. Hope to share my project soon!
Back in June 2014, we had a group Shrink Art Challenge. At the time, I managed to get as far as making a ruler out of opaque shrink plastic. While Jodie was home for winter break, we sat down to complete our Shrink Art Challenge. She'll be posting her cute finished project here soon. My "real" project has a lot of steps, so it will be a while before it's done.
In the mean time, I decided to make rulers out of the clear and white shrink plastic. Each type of plastic has a different rate of shrinkage, even when baked at the same temperature and at the same time. So I took the time to make these rulers so that I could have an accurate measure for future shrinking projects.
I used Sharpies as my color fill. Having an example of how each color reacts to the different plastics is useful. Each ruler started out in one-inch increments. Holes were punched in the ends to help determine size for future use of jump rings in jewelry.
The hole on the left began as a standard 1/4 inch hole punch.
The smaller hole on the right began as a 1/8" hole punch.
All this prep is not as much fun as working on actual projects, but it's good to test the materials before beginning. Hope to share my project soon!
Saturday, December 27, 2014
Double Challenge Trouble
As 2014 quickly draws to a close, Mom and I feel queasy leaving some of our monthly challenges unfinished. So, with an eye on efficiency and fun, we got together to nail down some of these projects.
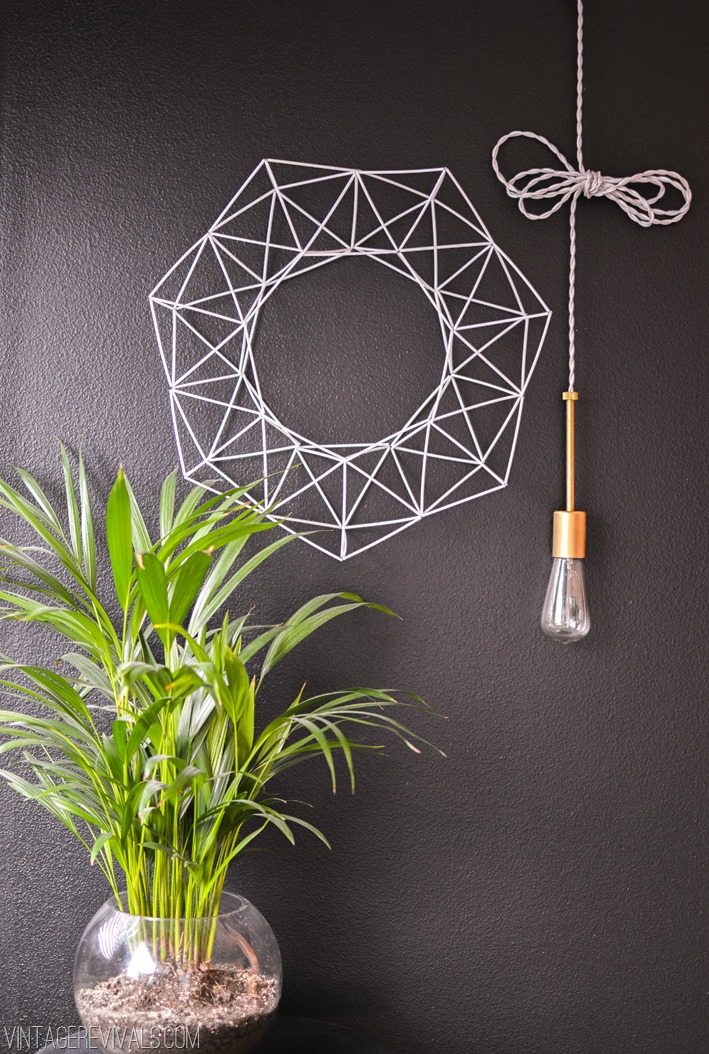
This first completed project combines both our October beading challenge and our December wreath challenge. We really liked the look of this Hemmeli wreath and decided to duplicate it for ourselves.
The instructions were incredibly easy to follow. We used coffee stirrers rather than cocktail straws and 24 gauge wire rather than 30 gauge, and our Hemmeli wreaths turned out beautifully.
This first completed project combines both our October beading challenge and our December wreath challenge. We really liked the look of this Hemmeli wreath and decided to duplicate it for ourselves.
| From Vintage Revivals |
The instructions were incredibly easy to follow. We used coffee stirrers rather than cocktail straws and 24 gauge wire rather than 30 gauge, and our Hemmeli wreaths turned out beautifully.
Wednesday, December 10, 2014
Cave Digger
I saw a great piece about an artist, Ra Paulette, who spends his time building, sculpting, and creating art in caves. This is a detail shot from one of his caves.
This video is worth watching to learn more.
.
This video is worth watching to learn more.
.
Wednesday, October 22, 2014
October Group Challenge: Beader Late Than Never
So, October's AuralArtists' Challenge is supposed to be, crafting with beads!

It's quite late in the month to be finally posting the challenge, but we've all been a bit busy with jobs, school starting, house reorganizing, and a year-long project that was finally completed.
Hopefully, at least one or two of us will still be able to complete this project.
Pintrest board ideas here!
It's quite late in the month to be finally posting the challenge, but we've all been a bit busy with jobs, school starting, house reorganizing, and a year-long project that was finally completed.
Hopefully, at least one or two of us will still be able to complete this project.
Pintrest board ideas here!
Subscribe to:
Posts (Atom)